タイムラインを表示するには何をすれば良いのか?
ではタイムラインを表示するにはどんなことが必要なのでしょうか?
以下にまとめました。
開発者ツールへの登録
まずは、インスタグラムへ開発者として登録を行います。
特に審査などもなく細かい個人情報も不要です。
後で詳しく見ていきますが、"Instagram Developper" というものに登録します。
アプリケーションの登録
次に Web アプリケーションを登録します。
これもここで紹介するテスト環境のような "Sandbox" の範囲なら難しい登録はありません。
アクセストークンの取得
登録した Web アプリに接続する為のアクセストークンを取得します。
認証は他にもありますが、タイムラインを表示するだけならアクセストークン方式が楽です。
アクセストークンは長いランダムな文字列でこれを使うことで自分のアカウントへのアクセスを認証させます。
認証できると色々な情報が手に入るようになります。
投稿内容の情報を取得
先ほどのアクセストークンを使って認証させて、投稿を表示するのに必要な情報をまとめて取得します。
返ってくる情報はコメントや画像への URL など様々で JSON 形式のデータが受け取れます。
タイムラインを整形してWebページに表示
最後に受け取ったデータを HTML コードに書き下して CSS などで整形して表示させます。
受け取った情報をどのように処理するかは自由です。
下準備をしよう!開発者ツールからアクセストークンを取得!
では具体的なやり方を説明していきます。
コーディングに入る前に下準備としてアクセストークンを取得していきます。
アクセストークンが取得できれば以下のようなデータを受信できます。
インデントも整形もされていないので人間には分かりにくいですがコンピュータには正確に分かりやすいデータとなっています。
{"pagination": {"next_max_id": "*******************_*********", "next_url": "https://api.instagram.com/v1/users/5519133378/media/recent?access_token=***************************************************\u0026count=1\u0026max_id=********************_*********"}, "data": [{"id": "********************_*********", "user": {"id": "5519133378", "full_name": "\u5c71\u672c\u5927\u4ecb", "profile_picture": "https://scontent.cdninstagram.com/vp/62ad0281884aa1ede3dbece1164f994f/5C941D14/t51.2885-19/s150x150/18646149_222300948260251_6120500908456411136_a.jpg", "username": "b4rskbe5"}, "images": {"thumbnail": {"width": 150, "height": 150, "url": "https://scontent.cdninstagram.com/vp/78159ed7d11fc8d41d01412c74d2763f/5CB15DDE/t51.2885-15/e35/c180.0.720.720/s150x150/44856250_754958991521572_2436797421667765030_n.jpg"}, "low_resolution": {"width": 320, "height": 213, "url": "https://scontent.cdninstagram.com/vp/e109a058f3d3a9e6c893b5950dccc560/5CA090B9/t51.2885-15/e35/s320x320/44856250_754958991521572_2436797421667765030_n.jpg"}, "standard_resolution": {"width": 640, "height": 426, "url": "https://scontent.cdninstagram.com/vp/a1feb6a38ebfcb94eddb9f2cbaeb4389/5CADE4EE/t51.2885-15/sh0.08/e35/s640x640/44856250_754958991521572_2436797421667765030_n.jpg"}}, "created_time": "1543226960", "caption": {"id": "17973224803152218", "text": "\u7279\u5225\u306a\u65e5\u306e\u8a18\u5ff5\u306b\u3002\nTo celebrate a special day....\n-----------\nCamera : SONY a6300\nLens : SONY SEL85F18\nStrobo : Godox thinklite TT600S\nRadioController : Godox X1T-s\n-----------\nf/2.8 1/100sec ISO100\nflash:1/8\n-----------\n#\u6307\u8f2a #\u7d50\u5a5a\u6307\u8f2a #\u30b5\u30f3\u30bb\u30c3\u30c8\u30b9\u30bf\u30b8\u30aatv #\u30d6\u30c4\u64ae\u308a #\u30d6\u30c4\u64ae\u308a\u7df4\u7fd2 #ring #rings #weddingring #weddingband #macro #stilllife #stilllifephotography #still_life_gallery @still_life_gallery_ #stilllifegallery #strobo #sonysel85f18 #sel85f18 #godox #godoxtt600s #tt600s #godoxx1ts #x1ts #sony #a6300 #\u03b16300", "created_time": "1543226960", "from": {"id": "5519133378", "full_name": "\u5c71\u672c\u5927\u4ecb", "profile_picture": "https://scontent.cdninstagram.com/vp/62ad0281884aa1ede3dbece1164f994f/5C941D14/t51.2885-19/s150x150/18646149_222300948260251_6120500908456411136_a.jpg", "username": "b4rskbe5"}}, "user_has_liked": false, "likes": {"count": 50}, "tags": ["godoxtt600s", "weddingband", "macro", "sonysel85f18", "sel85f18", "\u30d6\u30c4\u64ae\u308a\u7df4\u7fd2", "rings", "\u30d6\u30c4\u64ae\u308a", "tt600s", "\u6307\u8f2a", "sony", "stilllifephotography", "stilllife", "\u30b5\u30f3\u30bb\u30c3\u30c8\u30b9\u30bf\u30b8\u30aatv", "x1ts", "stilllifegallery", "ring", "a6300", "strobo", "\u03b16300", "weddingring", "still_life_gallery", "godoxx1ts", "\u7d50\u5a5a\u6307\u8f2a", "godox"], "filter": "Normal", "comments": {"count": 1}, "type": "image", "link": "https://www.instagram.com/p/Bqo8EhUFhUD/", "location": null, "attribution": null, "users_in_photo": []}], "meta": {"code": 200}}
Instagram Developperに登録する方法
まずは以下のページにアクセスして下さい。
Instagram Developer Documentation
上記ページにアクセスしてログインすると右上にアイコンとユーザ名が表示されます。
既にブラウザから Instagram のアカウントにログインしている場合は改めてログインする必要はありません。
上記のようなページが表示されますので、"Hello Developpers." の下にある "Resister Your Application" という青いボタンをクリックします。
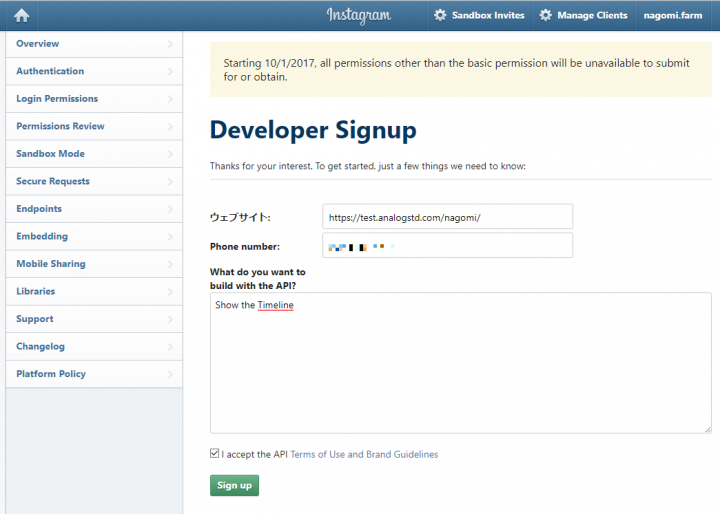
開発者として登録されていない場合は開発者の登録画面が表示されます。
Web サイトの URL と電話番号、簡単な説明を入力して登録は完了です。とても簡単です。
URL は存在しないものでも大丈夫そうですが、存在するサイトの方が良いと思います。
入力が終われば "I accept API" にチェックして、"Sign up" をクリックで登録を完了させます。
無事登録が終わると以下の画面が表示され、API の設定に移れます。
API Clientを登録する方法
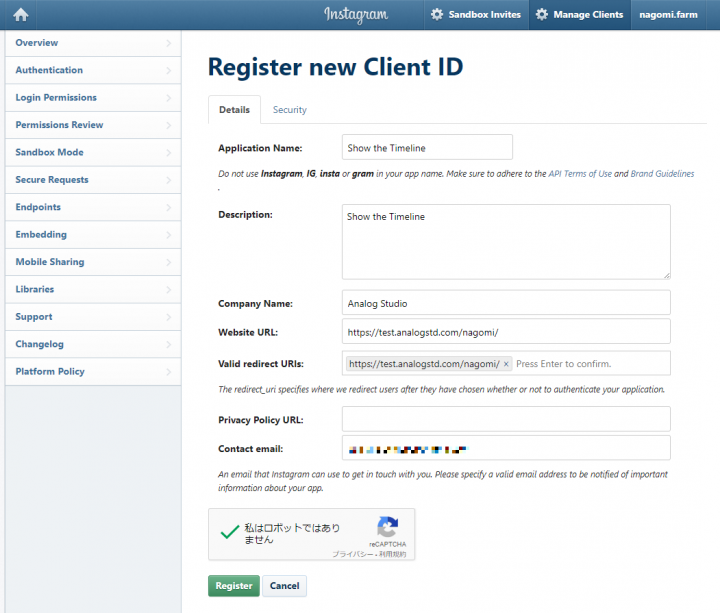
開発者として登録されたらアプリケーション (API Clien) を登録していきましょう。
機能制限あり※の "Sandbox Mode" を使うなら深く考えずに適当に埋めれば大丈夫です。
※アクセス頻度:500回/時間まで、投稿の取得数上限:最新20投稿まで、外部ユーザ登録:10人まで
開発者の登録完了画面か右上の "Manage Clients" から "Resister a New Client" という緑のボタンから登録画面に移れます。
ここもそれほど考えずに適当に埋めれば大丈夫です。"Privacy Policy URI" は無くても問題なく登録できますのでご安心を。
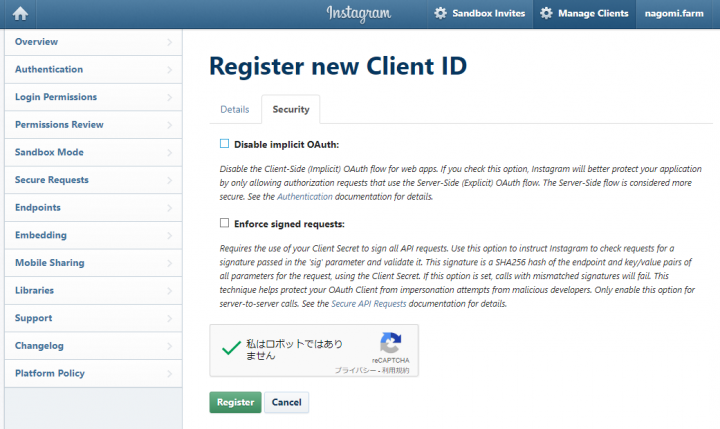
"Security" タブの "Disable implicit OAuth" のチェックは外しておいて下さい。これがあるとアクセストークン認証ができません。
但し、"Valid redirect URIs" はアクセストークン取得時に必要になるので覚えておいて下さい。
(登録後に変更などもできるます)
全て記入できたらロボットでないにチェックして登録します。
すると、以下のような "Client ID" というものが表示されます。これも後で使うのでメモして下さい。
Client ID は長い英数字ですので驚かないように。
例えば 87fdgdf87890gd124hh9nf943n34r29j といった文字列です。(これは適当に作ったものです)
アクセストークンを取得する方法
ようやく下準備も大詰めです。情報取得のためのアクセストークンを作ります。
ここまで準備してくればもう簡単です。
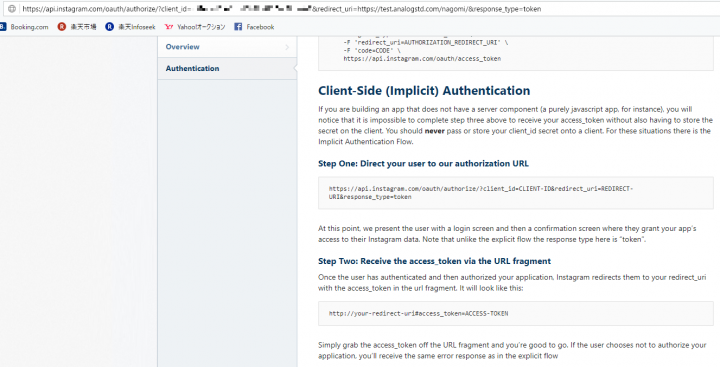
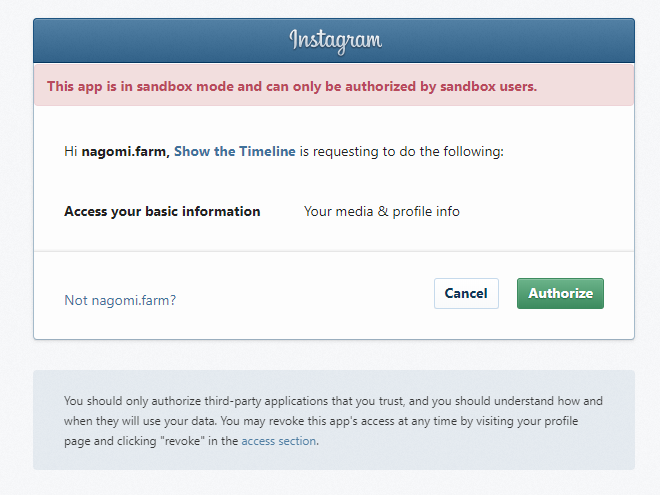
以下の URL にしてアドレスバーに入れてアクセスすれば、"Valid redirect URIs" にアクセストークンが GET で送信されてきます。
https://api.instagram.com/oauth/authorize/?client_id=CLIENT-ID&redirect_uri=REDIRECT-URI&response_type=token
URL を作るのが面倒だよ!という方は以下に "Client ID" と "Valid redirect URIs" を入れれば生成できるようにしておきました。
是非ご活用下さい。データを取得するようなスクリプトではないのでご安心ください(笑)
アクセストークンは ID よりもさらに長い長い文字列となります。
例えば 5354657865.46rgeqa.4hgtfjhty124dr0g4d2r4g2dfgd4fg2 とかなりの長さです。(これは適当に作ったものです)
これで無事にアクセストークンが取得できましたね。
これを使えば情報を自由に扱うことが可能になります。
インスタグラム情報へのアクセス方法
アクセストークンを使って以下の URL にアクセスすると情報を取得できます。
PHP などからは file_get_contents() 関数が扱いやすいです。
Javascript からならコールバック関数の形で返してもらう手法が良いでしょう。
- ユーザ情報 : https://api.instagram.com/v1/users/self/?access_token=アクセストークン
- 投稿情報 : https://api.instagram.com/v1/users/self/media/recent/?access_token=アクセストークン&count=取得する投稿数
Javascript から取得する為にコールバック関数を設定するなら "&callback=コールバック関数名(任意)" を付け加えます。
すると "コールバック関数名([JSON形式のデータ])" という文字列で返ってきます。
<SCRIPT> 要素の src 属性に指定すればコールバック関数が即時実行され、データ取得できます。
PHPでデータ取得してJavascriptで表示させよう!
では最後にコーディングしていきましょう。
データの取得は Javascript でもできますが、アクセストークンが丸見えになってしまうので、PHP で取得するようにします。
ついでなので、"Sandbox Mode" のアクセス制限を回避させて、更に高速化もしておきます。
PHPのコーディング
以下のコードを見て下さい。特に難しいことはしていませんので、解説は不要かもしれません。
ここでは PHP で HTML の生成まで一括して行っています。(Javascript でやってもOKです)
このコードではディレクトリ生成させていないので、この PHP ファイルと同じ階層に "cache" ディレクトリを作っておいて下さい。
<?php
$access_token = "アクセストークン";
// $test = "@"; // 新規リクエストかどうか確認する為
// キャッシュしておいたファイルが指定時間以内に更新されていたらキャッシュしたファイルのデータを使用する
// 指定時間以上経過していたら新たに Instagaram API へリクエストする
$cache_lifetime = 3600; // キャッシュの最短更新間隔 [sec] とりあえず初期値で1時間に設定
$cache_lastmodified = @filemtime(dirname(__FILE__)."/cache/instagram_usrinfo.dat"); // 違う場所にキャッシュするなら適宜書き換えて下さい
// 更新日時の比較
if(!$cache_lastmodified){ // キャッシュが存在しない場合
$usrinfo_json = @file_get_contents("https://api.instagram.com/v1/users/self/?access_token=". $access_token);
$posts_json = @file_get_contents("https://api.instagram.com/v1/users/self/media/recent/?access_token=". $access_token. "&count=9");
file_put_contents(dirname(__FILE__)."/cache/instagram_usrinfo.dat", $usrinfo_json, LOCK_EX);
file_put_contents(dirname(__FILE__)."/cache/instagram_posts.dat", $posts_json, LOCK_EX);
} else{
if(time() - $cache_lastmodified > $cache_lifetime){ // キャッシュはあるが古い場合
$usrinfo_json = @file_get_contents("https://api.instagram.com/v1/users/self/?access_token=". $access_token);
$posts_json = @file_get_contents("https://api.instagram.com/v1/users/self/media/recent/?access_token=". $access_token. "&count=9");
file_put_contents(dirname(__FILE__)."/cache/instagram_usrinfo.dat", $usrinfo_json, LOCK_EX);
file_put_contents(dirname(__FILE__)."/cache/instagram_posts.dat", $posts_json, LOCK_EX);
} else{ // キャッシュがあって新しい場合
$usrinfo_json = @file_get_contents(dirname(__FILE__)."/cache/instagram_usrinfo.dat");
$posts_json = @file_get_contents(dirname(__FILE__)."/cache/instagram_posts.dat");
// $test = ""; // キャッシュから読み込んだら@を表示しない
}
}
// 取得したJSON形式データを配列に展開する
if($usrinfo_json){
$usrinfo_data = json_decode($usrinfo_json);
if($usrinfo_data->meta->code != 200){
$usrinfo_data = null;
}
}
if(isset($posts_json)){
$posts_data = json_decode($posts_json);
if($posts_data->meta->code != 200){
$posts_data = null;
}
}
?>
<!-- <article> -->
<header>
<section>
<h1>
<a href="https://www.instagram.com/" target="new" rel="noopener">Instagram</a>
</h1>
<h2>
<div>
<img src="<?php echo $usrinfo_data->data->profile_picture; ?>" alt="profile_picture">
</div>
<div>
<a href="https://www.instagram.com/<?php if(isset($usrinfo_data)){ echo $usrinfo_data->data->username; } ?>/" target="new" rel="noopener">
<?php if(isset($usrinfo_data)){ echo $usrinfo_data->data->full_name."\n"; } ?>
(<?php // echo $test; ?>@<?php if(isset($usrinfo_data)){ echo $usrinfo_data->data->username; } ?>)
</a>
</div>
</h2>
<p>
投稿数:<?php if(isset($usrinfo_data)){ echo $usrinfo_data->data->counts->media."\n"; } ?>
フォロワ:<?php if(isset($usrinfo_data)){ echo $usrinfo_data->data->counts->followed_by."\n"; } ?>
</p>
</section>
<nav id="instagram_layout_toggle">
<div id="instagram_layout_list">LIST</div>
<div id="instagram_layout_grid">GRID</div>
</nav>
</header>
<main id="posts_list">
<?php
if(isset($posts_data)){
foreach($posts_data->data as $data){
$caption = $data->caption->text;
$caption = mb_convert_encoding($caption, 'UTF8', 'ASCII,JIS,UTF-8,EUC-JP,SJIS-WIN');
$caption = preg_replace("/\n/", "<BR>", $caption);
$caption = preg_replace("/#(.+?)(\s|\n|#|@)/", "<a href=\"https://www.instagram.com/explore/tags/$1/\" target=\"new\" rel=\"noopener\">#$1</a>$2", $caption);
$caption = preg_replace("/@(.+?)(\s|\n|#|@)/", "<a href=\"https://www.instagram.com/$1/\" target=\"new\" rel=\"noopener\">@$1</a>$2", $caption);
?>
<div>
<a href="<?php echo $data->link; ?>" class="instagram" target="new" rel="noopener" title="likes:<?php echo $data->likes->count; ?>">
<div style="background-image: url('<?php echo $data->images->standard_resolution->url; ?>');">
<img src="<?php echo $data->images->standard_resolution->url; ?>" alt="likes:<?php echo $data->likes->count; ?>">
</div>
</a>
<p>
<?php echo $caption; ?>
</p>
</div>
<?php }} else{ ?>
<p>
投稿を読み込めませんでした。再度読み込んで下さい。
</p>
<?php } ?>
</main>
<!-- </article> -->
※古い PHP にも対応させる為に "dirname(__FILE__)" を使いましたが、PHP5.3 以降を使うことが分かっていれば "__DIR__" で書き換えた方がすっきりして分かりやすいです。
前半が Instagaram API からのデータ取得部です。キャッシュの更新日時の確認して古ければ更新します。
後半の HTML は適宜使いやすいように書き換えて下さい。
あとは、表示させたい場所に PHP の require() 関数などで読み込んでやれば表示されます。
このページで紹介する方法では、非同期読込とするので一旦 Javascript の XHR で整形後の HTML を受け取ります。
CSSでデザインを整形する
上記 HTML に対応した CSS です。
インスタっぽい表示になるようにしてありますが、適宜お好みのデザインに変えてみて下さい。
この CSS ではアイコンフォントの一つである Font Awesome 5 Free を使用していますので、こちらも読み込んでおく必要があります。
Font Awesome 5 Free の使い方などもまとめているので、そちらもご確認下さい。
また、インスタグラムのロゴっぽいオシャレなフォントを "Billabong" というフォントが近いようです。
検索すれば出てきますので、こちらも用意して CSS と同じディレクトリ内に入れておきましょう。
/* font-family for "Instagram Logo" */
@font-face{
font-family : 'Billabong';
font-style : normal;
font-weight : normal;
src : local('Billabong'), url('./Billabong.woff') format('woff');
}
article#SNS_Instagram{
display : block;
margin : 10px;
border : 1px solid rgba(0,0,0,0.3);
}
article#SNS_Instagram *{
text-align : left;
/* ヘッダ部分をインスタ風のグラデーションにする
color : white;
*/
}
article#SNS_Instagram header > section{
display : block;
margin : 0px;
padding : 10px;
/* ヘッダ部分をインスタ風のグラデーションにする
background-color : #b900b4;
background : linear-gradient(-135deg,#1400c8b4,#b900b4b4,#f50000b4);
*/
background-color : white;
background : linear-gradient(135deg,#ebff3712,#46ff4b12,#0affff12);
/**/
border-bottom : 1px solid #666;
}
article#SNS_Instagram header h1{
margin : 0px;
padding : 0px;
}
article#SNS_Instagram header h1 > a{
position : relative;
margin : 0px;
margin-left : 75px;
padding-left : 10px;
font-family : 'Billabong'; /* インスタロゴ風のフォント */
font-weight : 400;
font-size : 36px;
line-height : 50px;
letter-spacing : 0.03em;
/* ヘッダ部分をインスタ風のグラデーションにする */
color : inherit;
/**/
}
article#SNS_Instagram header h1 > a::before{
position : absolute;
top : 0px;
left : -75px;
content : '\f16d';
font-family : 'Font Awesome 5 Brands';
font-weight : 900;
font-size : 72px;
line-height : 75px;
width : 75px;
text-align : center;
/* ヘッダ部分をインスタ風のグラデーションにする */
background : linear-gradient(-135deg,#1400c8,#b900b4,#f50000);
background-clip : text;
text-fill-color : transparent;
-webkit-background-clip : text;
-webkit-text-fill-color : transparent;
/**/
}
article#SNS_Instagram header h2{
margin : 0px;
margin-left : 75px;
padding-left : 10px;
line-height : 25px;
display : flex;
}
article#SNS_Instagram header h2 div{
display : inline-block;
}
article#SNS_Instagram header h2 *{
font-size : 16px;
line-height : 25px;
}
article#SNS_Instagram header h2 div:first-child{
width : 25px;
height : 25px;
overflow : hidden;
border-radius : 25px;
}
article#SNS_Instagram header h2 div:first-child img{
width : 100%;
height : 100%;
}
article#SNS_Instagram header h2 div:nth-child(2){
margin-left : 5px;
}
article#SNS_Instagram header h2 div:nth-child(2) a{
font-size : 16px;
color : inherit;
}
article#SNS_Instagram header p{
display : none;
}
/* 表示形式を切り替える */
article#SNS_Instagram header nav{
display : none;
font-size : 0px;
text-align : center;
background : linear-gradient(0deg, rgb(197, 197, 197), rgb(245, 245, 245));
border-bottom : 1px solid rgba(0,0,0,0.3);
}
article#SNS_Instagram header nav > div{
position : relative;
display : inline-block;
width : 49%;
box-sizing : border-box;
padding : 5px;
font-size : 0px;
color : transparent;
text-align : center;
cursor : pointer;
}
article#SNS_Instagram header nav > div#instagram_layout_list::after{
content : '\f0c9';
font-family : 'Font Awesome 5 Free';
font-weight : 900;
font-size : 24px;
line-height : 34px;
color : #666;
vertical-align : middle;
}
article#SNS_Instagram header nav > div#instagram_layout_grid::after{
content : '\f00a';
font-family : 'Font Awesome 5 Free';
font-weight : 900;
font-size : 24px;
line-height : 34px;
color : #666;
vertical-align : middle;
}
article#SNS_Instagram header nav > div + div{
margin-left : 1%;
}
article#SNS_Instagram header nav > div + div::before{
content : '';
position : absolute;
display : block;
width : 1px;
left : -1%;
top : 0px;
bottom : 0px;
background-color : #666;
transform : translateX(-50%);
}
/* 本家インスタ風に3*3の格子状にサムネイルを並べる */
article#SNS_Instagram main#posts_grid{
display : flex;
padding-top : 1px;
font-size : 0px;
text-align : center;
flex-wrap : wrap;
}
article#SNS_Instagram main#posts_grid > div{
display : inline-block;
padding : 2px;
width : 33%;
box-sizing : border-box;
flex-grow : 1;
}
article#SNS_Instagram main#posts_grid > div > a{
position : relative;
display : block;
width : 100%;
padding-top : 100%;
}
article#SNS_Instagram main#posts_grid > div > a > div{
position : absolute;
top : 0px;
bottom : 0px;
left : 0px;
right : 0px;
overflow : hidden;
background-position : center;
background-size : cover;
}
article#SNS_Instagram main#posts_grid > div > a > div > img{
opacity : 0;
visibility : hidden;
}
article#SNS_Instagram main#posts_grid > div > p{
display : none;
}
/* サムネイルとコメントを並べる */
article#SNS_Instagram main#posts_list{
display : block;
height : 360px;
overflow-y : auto;
}
article#SNS_Instagram main#posts_list > div{
display : block;
margin : 5px;
padding : 5px;
border-radius : 5px;
border : 1px solid #999;
}
article#SNS_Instagram main#posts_list > div > a > div{
display : block;
position : relative;
padding-top : 50%;
overflow : hidden;
}
article#SNS_Instagram main#posts_list > div > a > div > img{
position : absolute;
top : 50%;
left : 0px;
width : 100%;
height : auto;
transform : translateY(-50%);
}
article#SNS_Instagram main#posts_list > div > p{
display : block;
margin : 5px;
padding : 0px;
color : #252525;
text-align : left;
word-break : break-all;
}
article#SNS_Instagram main#posts_list > div > p > a{
color : #3402A7;
cursor : pointer;
}
Javascriptで非同期に読み込む
Instagram API の応答速度は (私の環境では) 約700msとお世辞にも早いとはいえませんでしたので、非同期で読み込みます。
キャッシュに保存されているデータを使う限りはかなり高速で取得でき、更新のタイミングのページ表示の遅れは許容できるよ、という場合は直接 requrie() 関数で表示した方が楽で良いと思います。
やることは単純で XHR で先ほどの PHP を呼び出して結果の HTML を受け取り、必要な位置に表示させるだけです。
以下の例だと <div id="info_SNS"></div> (タグは何でも良い) の末尾に追加されます。
// DOMツリーが構築されたら実行する
// 画像などのメディアファイル読み込み後にインスタを表示するなら"DOMContentLoaded"を"load"に変更
window.addEventListener("DOMContentLoaded", function(){
getInstagram(); // Instagramのタイムラインを読み込む
}, false);
// インスタのタイムラインを読み込む
var getInstagram = function(){
// IEなどの一部ブラウザでXMLHttpRequestが使えないのでその対策でActiveObjectでも試す
var _lastModifiedRequest = window.XMLHttpRequest ? new XMLHttpRequest() :
window.ActiveXObject ? new ActiveXObject('Microsoft.XMLHTTP') :
null;
// 表示させる要素セレクタをgetElementByIdで取得する
if(document.getElementById("info_SNS")){
var _infoSNS = document.getElementById("info_SNS").appendChild(document.createElement("article"));
} else{
return 0;
}
if(_lastModifiedRequest){
if(!currentScriptDirectory) return 0; // ディレクトリが取得できなかったら終了(後ろの方で定義してます)
// currentScriptDirectoryはこのscriptが掛かれた外部jsファイルのディレクトリパスが入る
// もちろん絶対パスで書いても大丈夫です
_lastModifiedRequest.open("GET", currentScriptDirectory + "instagram.php", true); // GETで先ほどのPHPから整形済みHTMLコードを取得させる
_lastModifiedRequest.onreadystatechange = function(){
if(_lastModifiedRequest.readyState == 4 && _lastModifiedRequest.status == 200){
// 正常に読み込めたらHTMLに書き出し
_infoSNS.id = "SNS_Instagram";
_infoSNS.innerHTML = _lastModifiedRequest.responseText;
} else if(_lastModifiedRequest.readyState == 4 && _lastModifiedRequest.status != 200){
_infoSNS.innerHTML = "<p>取得に失敗しました。再読込して下さい。</p>";
}
};
_lastModifiedRequest.send(null); // GETでリクエスト実行
}
// インスタの読み込みが終わったら表示切替用の関数を呼び出す
// innerHTMLで書き出すとDOMツリーが構成されるまで少し時間が掛かるので150msごとにチェックしてDOMができたらクリックイベントを登録する
(function _DOMcheck(){
if(_infoSNS.firstChild){
instagramLayout();
} else{
setTimeout(_DOMcheck, 150);
}
})();
};
// インスタ投稿のレイアウトを切り替える
// タイムラインのDOMツリーが構成され次第、呼び出される
var instagramLayout = function(){
var _instagramTimeline = document.getElementById("SNS_Instagram");
if(_instagramTimeline){
var _main = _instagramTimeline.getElementsByTagName("main")[0];
var _nav = document.getElementById("instagram_layout_toggle");
var _list = document.getElementById("instagram_layout_list");
var _grid = document.getElementById("instagram_layout_grid");
if(_nav && _list && _grid){
_list.addEventListener("click", function(){
_main.id = "posts_list";
}, false);
_grid.addEventListener("click", function(){
_main.id = "posts_grid";
}, false);
_nav.style.display = "block";
}
}
};
// この外部scriptのファイルパスを取得して変数に保存しておく
// 戻り値は最後の"/"が残る
// 取得に失敗した場合は"null"を返す
var currentScriptDirectory = (function() {
if(document.currentScript){
var _directory = document.currentScript.src;
_directory = _directory.split("/");
_directory = _directory.splice(0, _directory.length - 1);
_directory = _directory.join("/") + "/";
return _directory;
} else{
var _scripts = document.getElementsByTagName("script");
var _script = _scripts[_scripts.length - 1];
if(_script.src){
var _directory = _script.src;
_directory = _directory.split("/");
_directory = _directory.splice(0, _directory.length - 1);
_directory = _directory.join("/") + "/";
return _directory;
} else{
return null;
}
}
})();
実行結果
上記を実行すると以下のように表示されます。
まとめ
以上、インスタグラムのタイムラインを表示する方法でした。
手軽にできるとは云えませんが、一度作ってしまえばかなり汎用的に使えますし、カスタマイズも自由です。
今回はコーディングについては余り解説しませんでしたが、コード中のコメントを参考にして頂ければと思います。
不明点のお問合せが多ければ記事にまとめたいと思います。

